Instructions For AK Stock Replacement
Courtesy of UltiMAK Enhanced Performance
Each of the four parts of the AK stock are addressed separately:
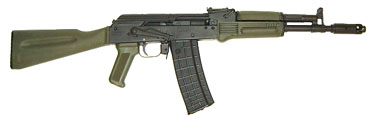
These instructions show an AK with a stamped (sheet metal) receiver. The Milled receivers have some minor differences in the buttstock and grip attachment, but the basic concepts are the same.
Also included are the “The Rules” — four simple rules that will prevent virtually all firearm accidents.
Always start by unloading the rifle– Remove magazine and clear the chamber, then keep ammunition away from the work area.
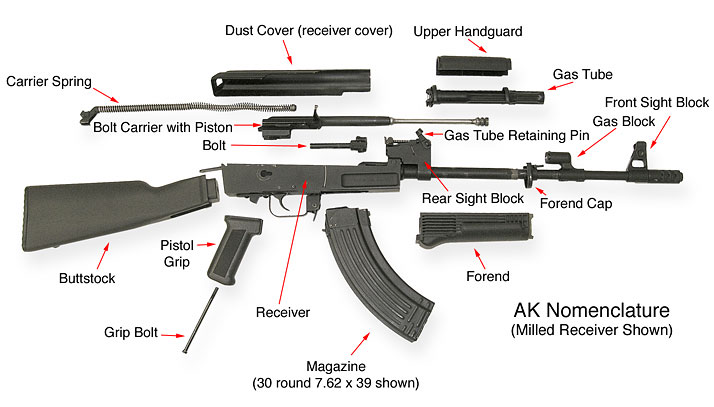
Buttstock
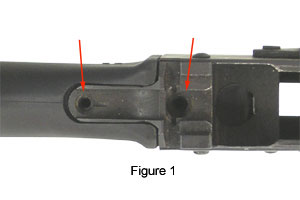
Field strip the rifle: Remove dust cover, carrier spring and bolt carrier assembly. Find a screwdriver that fits the buttstock screw slots perfectly (this is important) and remove the buttstock screws. Stamped receivers will have two of them (figure 1).
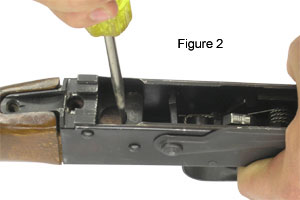
The quick and dirty method for removing the buttstock: Insert a flat bladed screwdriver into the large hole in the top of the rear trunion, and pry the buttstock backward out of the receiver (figure 2).
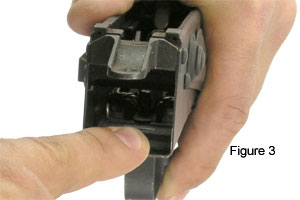
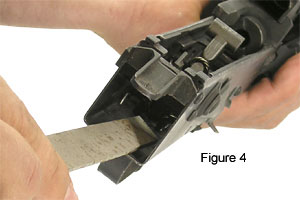
The rear socket formed by the back of the receiver is sometimes burred at the edges, which can make it more difficult to insert the new buttstock. Run your finger along the inside edges to feel for burrs (figure 3). Optional: You can use a bastard file to remove the burrs (figure 4).
Understand that AKs tend to be a bit variable in specs. Your aftermarket stock tenon is typically going to be made on the large side so as to fit most any AK. It may be necessary to file some material from the buttstock tenon to get it to fit. Insert the buttstock. This may require substantial pressure. Striking the buttstock into a carpeted floor or heavy bench top works great for us, but avoid damage to the buttplate– don’t hit it into a hard surface, such as concrete, without some padding in between. Caution: If you’re installing a folding or telescoping stock, using this technique may cause damage to the buttstock’s mechanism.
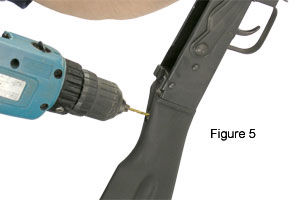
Once the buttstock is seated all the way into the receiver you can drill the pilot holes for the screws (figure 5). For most original AK tang screws a 9/64″ drill is about right. Be sure to start the holes in the exact center of the tang hole. A transfer punch works well for this. Drill to a depth at least equal to the screw’s length (usually about 0.9 to 1″)
Again using a screwdriver that perfectly fits the screw, support the rifle securely and turn the screws in all the way– hard against the countersinks in the tang. The forward screw on a stamped receiver AK must be seated all the way down into the countersink to clear the carrier spring support. This takes a lot of torque, so a big screwdriver handle, a driver that fits the screw, and a good secure hold on the rifle are all critical. Be safe. If you find that you cannot get the screw(s) in all the way, you may need to drill a larger and/or deeper hole.
UltiMAK sells a number of fixed, telescoping, and folding buttstocks, complete stock sets, and individual components here, so you can put together your own custom configurations.
Pistol Grip
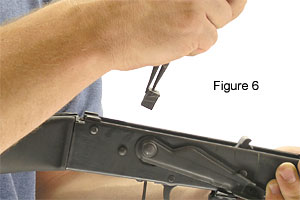
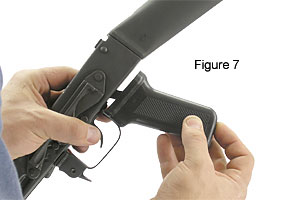
With the rifle field stripped, unscrew the pistol grip bolt and remove the grip. Be sure the grip nut is in the receiver so that it slants backward at the bottom (figure 6). Place the grip bolt into the new grip. Holding the grip nut in the receiver with your finger, insert the grip bolt and get the threads started (figure 7).
Tighten the bolt good and tight, then hold the grip and try to twist it back and forth, to get it seated into the trigger guard, then tighten the bolt some more. After a day at the range, you may need to tighten it again, since the grip may have seated further against the trigger guard.
Forend (lower handguard)
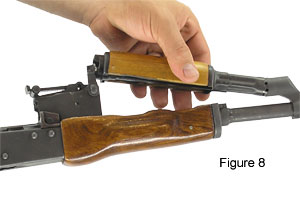
With the rifle field stripped, rotate the gas tube retaining pin lever upward until the gas tube can be lifted at the back and removed from the rifle (figure 8).
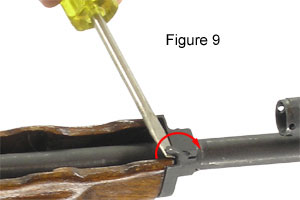
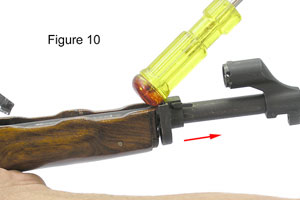
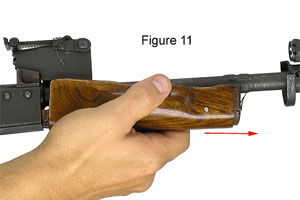
You can now access the forend retaining lever at the right-hand inside edge of the forend cap. Use a flat bladed screwdriver to pry the retaining lever up and around 180 degrees, so that it points toward the muzzle (figure 9). If your rifle has a stowed cleaning rod, make sure it is removed at this time. Now the forend cap can slide forward. You may need to tap it forward using a mallet or the plastic butt of a screwdriver (figure 10). Now you can work the forend forward, out of the front of the receiver and off the rifle (figure 11).
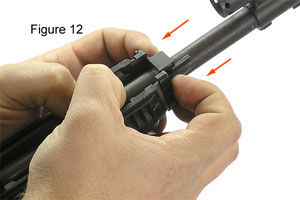
Installation is the reverse. The new forend may need to be squeezed inward at the sides, and upward against the barrel in front, to get it inside the forend cap (figure 12). This ensures a tight fit.
Some AKs have a lot more space in the front of the receiver than others. Being designed to fit most AKs, the aftermarket forend tenon may need to be trimmed to fit. A common #2 mill/bastard file is fine for minor adjustments, but a razor saw (sometimes called a hobbyist’s saw) or even the saw in a Leatherman tool, may be needed for taking off larger amounts of material. Do not trim too much– go for a good tight fit.
Be sure to rotate the forend cap retaining lever into its locked position before installing the gas tube.
If you’re installing a new forend in conjunction with the UltiMAK AK optic mount, follow the directions for the mount. In some cases it may be necessary to first install the UltiMAK optic mount with the forend off and the forend cap unlocked– tighten the optic mount screws most of the way to pull the mounting clamps up into the mount and out of the way. You can now install the forend and slide the forend cap into place. Then remove the mount screws and remove the mount. You can now rotate the forend retaining lever into its locked position. Your optic mount clamps are now held in place by the forend (or forend heat shield if applicable). Reinstall the optic mount and fully tighten the screws. Below is a You Tube video showing the installation of the KVFS-OD on a Chinese MAK-90;
Upper handguard
With the rifle field stripped, rotate the gas tube retaining lever upward until the gas tube can be pulled upward at the back, and off the rifle (figure 8). (If installing an UltiMAK AK forward optic mount, you need go no further with this section because the mount replaces the entire gas tube/upper handguard assembly. Refer to the instructions for optic mount installation)
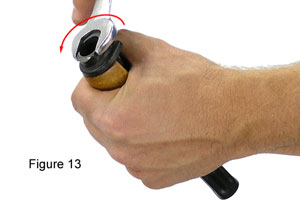
Using a wrench or a bench vise, gently lock across the flat side portions in back of the gas tube. Grab the handguard firmly and rotate it around the gas tube axis until it is exactly upside-down (figure 13).
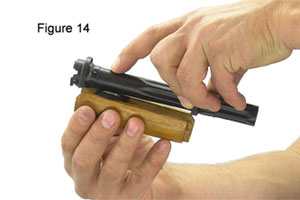
This may take considerable force. Now the handguard can be pushed straight down and off the gas tube (figure 14).
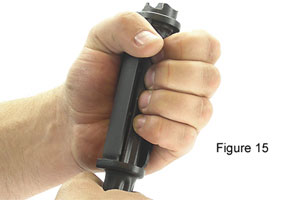
There is a metal pressure clip in most wooden upper handguards. This is not needed for the new synthetic handguard. Reassembly is the reverse. Notice that there is a definite front and back to the handguard– It is larger in back and tapers toward the front. The handguard must be pushed up into the gas tube with some force before it will rotate into place (figure 15). Before you reinstall the gas tube, be sure the forend retaining cap is locked in position.
Now enjoy your work. Clean the bore and bolt, take up some ammo and do some shooting. Remember; The AK’s inherent accuracy is generally underestimated. Nearly all rifles shoot more accurately than their owners.
Remember “The Rules” too;
1. Always keep the gun pointed in a safe direction.
2. Always keep your finger off the trigger (we like to say “out of the trigger guard”) until you’re ready to shoot.
3. Always keep the gun unloaded until ready to use.
4. Know your target and what is beyond it.
The first three rules are standard NRA rules and will serve you well. We add the fourth, which comes from Cooper, as a way to help you think about your shooting situations in the field.
You can spot an inexperienced and/or undisciplined shooter a block away, because among other things, you’ll see the trigger finger go right onto the trigger as soon as the rifle is in the hands (see rule 2 above).